Wednesday, October 28, 2020

Project 1 - Simple Square Motif

Project 1 - Simple Square Motif 

In project 1 you will get the opportunity to practice reading patterns, holding the hook and yarn, creating a slipknot, doing a yarn over, chain stitch, double crochet and a slip stitch, work in rows, turn the corner, increase, finish/fasten off and weave ends.

Why not try out this project once you have completed  beginners learn to crochet workshops 1 to 10

PROJECT 1: SIMPLE SQUARE MOTIF

UK Terms

Techniques used: Reading patterns, holding hook and yarn, slipknot, yarn over, chain stitch, double crochet, slip stitch, work in rows, turn the corner, increase, finish/fasten off and weave ends.

Skill level: 
Terms: 

Materials:


Size:
Gauge:
Abbreviations: 


Easy
UK Terms
Skip to US Terms
DK yarn
4mm hook
Scissors
Darning needle
Approx. 15 cm x 15 cm
Not important
Chain(ch)
Double crochet(dc)
Slip Stitch(slst)
Fasten/Finish off(FO)
Stitch(st)
Repeat(rep)


Instructions:  

Using your chosen yarn make ch27.

Row 1: Work dc in 2nd ch from the hook, dc in each ch to the end of row. Turn.  (26 sts)

Row 2: Ch1, dc into each st to the end of the row. Turn.  (26 sts)

Row 3-30: Rep row 2 until your square measures 13cm, approx 30 rows.

Border Row 1: Ch1, *dc into each st across to the last st in the row, make 3dc into the last stitch this will create the corner turn*, repeat for two more sides, on the last side dc across to the last st in the row, make 2dc into the same st as the first st of the border - note the 1st dc for the corner was made at the beginning of the border row, slst to join to the first dc. (Each border row adds 2 sts to your stitch count for each side)

The chart below is a simplified version of how to switch from rows to working the border.
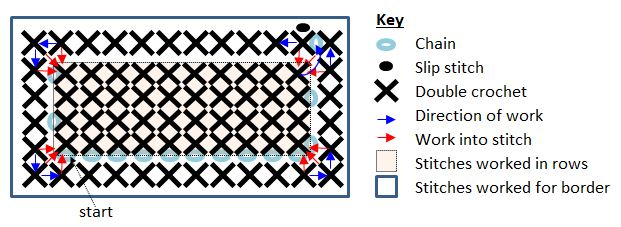
Border Row 2-4: Continue working in a around.  Rep border row 1 until your square measures 15cm, approx 4 rows.  FO.  


US Terms

Techniques used: Reading patterns, holding hook and yarn, slipknot, yarn over, chain stitch, single crochet, slip stitch, work in rows, turn the corner, increase, finish/fasten off and weave ends.

Skill level: 
Terms: 

Materials:


Size:
Gauge:
Abbreviations: 


Easy
US Terms
Skip to US Terms
DK yarn
4mm hook
Scissors
Darning needle
Approx. 15 cm x 15 cm
Not important
Chain(ch)
Single crochet(sc)
Slip Stitch (slst)
Fasten/Finish off(FO)
Stitch(st)
Repeat(rep)


Instructions:  

Using your chosen yarn make ch27.

Row 1: Work sc in 2nd ch from the hook, sc in each ch to the end of row. Turn.  (26 sts)

Row 2: Ch1, sc into each st to the end of the row. Turn.  (26 sts)

Row 3-30: Rep row 2 until your square measures 13cm, approx 30 rows.

Border Row 1: Ch1, *sc into each st across to the last st in the row, make 3sc into the last stitch this will create the corner turn*, repeat for two more sides, on the last side sc across to the last st in the row, make 2sc into the same st as the first st of the border - note the 1st sc for the corner was made at the beginning of the border row, slst to join to the first sc. (Each border row adds 2 sts to your stitch count for each side)

The chart below is a simplified version of how to switch from rows to working the border.

Border Row 2-4: Continue working in a around.  Rep border row 1 until your square measures 15cm, approx 4 rows.  FO.  


Click here for the next workshop... 12 Treble Crochet


Find the complete list of my tutorials here or if you prefer you can find the full left and right handed playlists on YouTube

Please remember to subscribe to my newsletter then you will be kept up to date with all my latest patterns and tutorials.  You can also follow me on FacebookPinterest and Instagram.

Happy crocheting

                Jo

Sunday, October 25, 2020

LEARN TO CROCHET WORKSHOP 11 - Granny Square

Granny Square

In part 2 of the complete beginners crochet course we focus on the basics, workshop 11 covers the Granny Square.

What is a crochet granny square


Workshop objectives:

  • Introducing the granny square
  • Practice with project 1 Simple Square Motif
  • Handout Crochet Pattern UK & US Terms

Watch Now


Task & Project List - UK & US Terms


After completing workshop 11

PROJECT 1:

·     Try Simple Square Motif here


Click here for the next workshop... 12 Treble Crochet


Find the complete list of my tutorials here or if you prefer you can find the full left and right handed playlists on YouTube

I hope you find this tutorial helpful. 

Please remember to subscribe to my newsletter then you will be kept up to date with all my latest patterns and tutorials.  You can also follow me on FacebookPinterest and Instagram.


Happy crocheting

                Jo

Wednesday, October 21, 2020

LEARN TO CROCHET WORKSHOP 10 - Finish & Weave Ends

Finish and Weave Ends

In part 2 of the complete beginners crochet course we focus on the basics, workshop 10 covers how to Finish and Weave Ends.

 How to Finish and Weave Ends in crochet


Workshop objectives:

  • Find out how to finish a project
  • Learn how to fasten off
  • Understand how to weave ends
  • Practice with task 8

Watch Now


Task & Project List - UK & US Terms


After completing workshop 10 

TASK 8:

     ·      Slipstitch to join

·     Finish off the work you have created in tasks 1 to 7

·     Weave ends


Click here for the next workshop... 11 Granny Square


Find the complete list of my tutorials here or if you prefer you can find the full left and right handed playlists on YouTube

I hope you find this tutorial helpful. 

Please remember to subscribe to my newsletter then you will be kept up to date with all my latest patterns and tutorials.  You can also follow me on FacebookPinterest and Instagram.


Happy crocheting

                Jo

Sunday, October 18, 2020

LEARN TO CROCHET WORKSHOP 9 - Turn the Corner

Turn the Corner

In part 2 of the complete beginners crochet course we focus on the basics, workshop 9 covers how to turn the corner.

 how to turn the corner in crochet


Workshop objectives:

  • Understand why you need to turn
  • Learn how to turn the corner
  • Practice with task 7

Watch Now

 Right Handed Video


 Left Handed Video

Task & Project List - UK Terms


After completing workshop 9

TASK 7:

·     Create a border around the work you have created in tasks 1 to 6 using 3 double crochets in each corner


Task & Project List - US Terms


After completing workshop 9

TASK 7:

·     Create a border around the work you have created in tasks 1 to 6 using 3 single crochets in each corner


Click here for the next workshop... 10 Finish and Weave Ends


Find the complete list of my tutorials here or if you prefer you can find the full left and right handed playlists on YouTube

I hope you find this tutorial helpful. 

Please remember to subscribe to my newsletter then you will be kept up to date with all my latest patterns and tutorials.  You can also follow me on FacebookPinterest and Instagram.


Happy crocheting

                Jo

Wednesday, October 14, 2020

LEARN TO CROCHET WORKSHOP 8 - Increase & Decrease

Increase and Decrease

In part 2 of the complete beginners crochet course we focus on the basics, workshop 8 covers increasing and decreasing.

 how to increase and decrease in crochet


Workshop objectives:

  • Understand what it means to increase
  • Create an increase
  • Understand what it means to decrease
  • Create a decrease
  • Practice with task 6

Watch Now

 Right Handed Video


 Left Handed Video


Task & Project List - UK Terms


After completing workshop 8

TASK 6:

      ·        Continue with the pattern

      ·        Follow the pattern below from row 8

      ·        Increase within a double crochet row

      ·        Decrease within a double crochet row

        ·        Work a double crochet row

Note: The foundation row and rows 1-7 have been completed in tasks 1 to 5.

Abbreviations: Chain (ch)

                        Double crochet (dc)

                        Double crochet 2 together (dc2tog)

                        Repeat (rep)

                        Stitch (st)

Row 8: ch1, dc, *dc, 2dc, dc* rep from * to * twice, dc2, rep from * to * twice.

Row 9: ch1, *dc, dc2tog, dc* rep from * to * twice, dc2, rep from * to * twice, dc.

Row 10: ch1, dc into each st across.

Pattern in symbols:


Task & Project List - US Terms


After completing workshop 8

TASK 6:

      ·        Continue with the pattern

      ·        Follow the pattern below from row 8

      ·        Increase within a single crochet row

      ·        Decrease within a single crochet row

        ·        Work a single crochet row

Note: The foundation row and rows 1-7 have been completed in tasks 1 to 5.

Abbreviations: Chain (ch)

                        Single crochet (dc)

                        Single crochet 2 together (dc2tog)

                        Repeat (rep)

                        Stitch (st)

Row 8: ch1, sc, *sc, 2sc, sc* rep from * to * twice, sc2, rep from * to * twice.

Row 9: ch1, *sc, sc2tog, sc* rep from * to * twice, sc2, rep from * to * twice, sc.

Row 10: ch1, sc into each st across.

Pattern in symbols:


Click here for the next workshop... 9 Turn the corner


Find the complete list of my tutorials here or if you prefer you can find the full left and right handed playlists on YouTube

I hope you find this tutorial helpful. 

Please remember to subscribe to my newsletter then you will be kept up to date with all my latest patterns and tutorials.  You can also follow me on FacebookPinterest and Instagram.


Happy crocheting

                Jo

Sunday, October 11, 2020

LEARN TO CROCHET WORKSHOP 7 - Slip Stitch

Slip Stitch

In part 2 of the complete beginners crochet course we focus on the basics, workshop 7 covers the slip stitch

 how to create a slip stitch


Workshop objectives:

  • Learn how to create a slip stitch
  • Practice with task 5

Watch Now

 Right Handed Video


 Left Handed Video


Task & Project List - UK Terms


After completing workshop 7 

TASK 5:

     ·        Review the pattern below

     ·        Follow the pattern below from row 5

     ·        Create a chain space

     ·        Work a double crochet & slip stitch into the chain space

Note: The foundation row and rows 1-4 have been completed in tasks 1 to 4.

Abbreviations: Chain (ch)

                        Chain Space (ch-sp)

                        Double crochet (dc)

                        Repeat (rep)

                        Skip (sk)

                        Slip stitch (slst)

                        Stitch (st)

Row 5: ch1, dc, *ch2, sk2 sts, dc* rep from * to * once, ch1, sk1 st, dc, then rep from * to * twice.

Row 6: ch, dc. 2dc into ch-sp, dc, 2slst into ch-sp, dc, dc into ch-sp, dc, 2slst into ch-sp, dc, 2dc into ch-sp, dc.

Row 7: ch1, dc into each st across.


Pattern in symbols:


Task & Project List - US Terms


After completing workshop 7 

TASK 5:

     ·        Review the pattern below

     ·        Follow the pattern below from row 5

     ·        Create a chain space

     ·        Work a single crochet & slip stitch into the chain space

Note: The foundation row and rows 1-4 have been completed in tasks 1 to 4.

Abbreviations: Chain (ch)

                        Chain Space (ch-sp)

                        Single crochet (dc)

                        Repeat (rep)

                        Skip (sk)

                        Slip stitch (slst)

                        Stitch (st)

Row 5: ch1, sc, *ch2, sk2 sts, sc* rep from * to * once, ch1, sk1 st, sc, then rep from * to * twice.

Row 6: ch, sc. 2dc into ch-sp, sc, 2slst into ch-sp, sc, sc into ch-sp, sc, 2slst into ch-sp, sc, 2sc into ch-sp, sc.

Row 7: ch1, sc into each st across.


Pattern in symbols:


Click here for the next workshop... 8 Increase


Find the complete list of my tutorials here or if you prefer you can find the full left and right handed playlists on YouTube

I hope you find this tutorial helpful. 

Please remember to subscribe to my newsletter then you will be kept up to date with all my latest patterns and tutorials.  You can also follow me on FacebookPinterest and Instagram.


Happy crocheting

                Jo

Wednesday, October 7, 2020

LEARN TO CROCHET WORKSHOP 6 - Double Crochet - UK (Single Crochet - US)

Double Crochet - UK (Single Crochet - US)

In part 2 of the complete beginners crochet course we focus on the basics, workshop 6 covers the UK Double Crochet or known in the US as the Single Crochet.

UK Double Crochet - US Single Crochet


Workshop objectives:

  • Create a UK double crochet or US Single crochet
  • Identify the correct stitch placement
  • Create a turning chain
  • Learning how to count rows
  • Practice with task 3 & 4

Watch Now

 Right Handed Video


 Left Handed Video


Task & Project List - UK Terms


After completing workshop 5 & part of 6  

TASK 3:

     ·        Create 15 double crochets into your foundation chain

     ·        Create a double crochet turning chain & turn your work

     ·        Create 15 double crochets into the previous row

 After completing workshop 6 

TASK 4:

      ·        Work 2 more double crochet rows

        ·        Count the number of rows


Task & Project List - US Terms

After completing workshop 5 & part of 6  

TASK 3:

     ·        Create 15 single crochets into your foundation chain

     ·        Create a single crochet turning chain & turn your work

     ·        Create 15 single crochets into the previous row

 After completing workshop 6 

TASK 4:

      ·        Work 2 more single crochet rows

        ·        Count the number of rows


Click here for the next workshop... 7 Slip Stitch


Find the complete list of my tutorials here or if you prefer you can find the full left and right handed playlists on YouTube

I hope you find this tutorial helpful. 

Please remember to subscribe to my newsletter then you will be kept up to date with all my latest patterns and tutorials.  You can also follow me on FacebookPinterest and Instagram.


Happy crocheting

                Jo